Your Cart
Your shopping cart is currently empty.

Basic beat-matching
Beat-Matching is the skill of putting two different songs into the same tempo and mixing them together. It is probably the most important skill to learn when wanting to become a DJ. Whether you’re performing in your bedroom, at a house party or in a nightclub, beat-matching is a vital skill in any good DJ’s arsenal.
Beat-matching has become an easier skill to harness over time due to technological advances in equipment. This guide will give you the basics when it comes to mixing on your CDJ’s, All-In-One Consoles or, vinyl turntables.
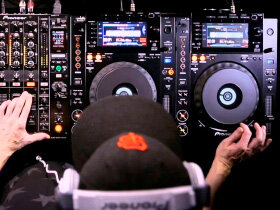
CDJ Beat-Matching
Step 1
When first starting to beat-match on your CDJ it’s important you pick two songs within similar genres or BPM (Beats-Per-Minute). The closer the song speeds are, the easier it will be to adjust them to the tempo.
Step 2
Once you have selected your two songs to mix, play your first song on CDJ 1. While this song is playing you should start listening to the second song you have selected on CDJ 2, through your headphones. This will allow you to adjust the tempo without it playing through the speakers.
Step 3
To adjust the tempo of the song in CDJ 2 to same BPM as is shown in CDJ 1 you will need to adjust the tempo fader, which is located on the right hand side of the CDJ. The tempo fader will adjust the BPM on the screen, displayed on the right hand side where it says BPM and then a number. That number is the BPM of the song you have selected. For example if CDJ 1 is showing a BPM of 121 and CDJ 2 is showing a BPM of 124 you will need to slow down CDJ 2 with the tempo fader until it shows 121.
Step 4
Now that both songs are at the same BPM you’ll need to cue the song in CDJ 2 so it’s playing at the same time as the song in CDJ 1. This can be done by tapping the cue button to the beat of CDJ 1 and on the 5th beat hit the play button on CDJ 2.
Step 5
Slowly raise the volume fader for CDJ 2 on the mixer so both songs start to blend together. If you find the song on CDJ2 is dragging or rushing you can adjust it by pushing the jog wheel forward to speed it up or pulling it back to slow the music down.
Step 6
Finally, once CDJ 2’s song has started to progress and CDJ 1’s song is coming to an end slowly pull the volume fader down for CDJ 1 on the mixer to complete the mix.
Vinyl Turntable Beat-Matching
Step 1
Pick two records that you think have a similar Tempo which both start on a drum beat. Then place one on each turntable. Press play on Turntable 1. While Turntable 1 is playing put the needle on the record where it is showing a clear black circle this clear black circle is showing where the song is about to start. There may be few clear circles throughout one side of the record, indicating there is more than one song on that side of the record.
Step 2
While Turntable 1 is playing, it’s time to get Turntable 2 in time. Place the needle at the start of the song for Turntable 2. Turntable 2’s volume fader should be down on the mixer and you should be listening to it through your headphones.
Step 3
Now you need to find the first beat of the song on Turntable 2. When the first beat plays, place your hand on the record to stop it moving. Now move the record back and forth with your hand to the beat of what is playing on turntable 1. The first drum hit you hear on Turntable 2 should be playing to the beat of Turntable 1.
Step 4
Once you have found the rhythm and are moving Turntable 2 back and forth to the beat of Turntable 1 you can release Turntable 2 when Turntable 1 starts a new bar. You need to get the BPM of Turntable 2 in time with the BPM (Beats Per Minute) of Turntable 1. This is done by moving the tempo fader, found on the right hand side of the turntable. If you think the record on Turntable 2 is too slow, move the fader down which will increase the speed the record. If it’s too fast move the fader up which will decrease the speed of the record.
Step 5
Once you think both songs are at the same BPM, move the needle of Turntable 2 back to the start of the song and follow step 3 again. Once both songs are playing in time, slowly move the volume fader allocated to Turntable 2, up, which can be found on the DJ mixer.
Step 6
Now both songs should be playing out through the speakers. If you find that Turntable 2 is starting to rush, you can slow it down by gently running your finger along the side of the plate that holds the record. If it’s starting to lag you can speed it up by placing your finger on the record and gently pushing it forward.
Step 7
Once you are ready to finish the mix take the volume down on Turntable 1 and let Turntable 2 play out.
Serato / Rekordbox Beat-Matching
Step 1
Although digital dj controllers can vary in layout, they all fundamentally work the same way when hooked up to Serato or Rekordbox. Once you have launched either software on your laptop/desktop go to your music library and select two songs. This is done by clicking on the song you want and dragging it onto Deck 1 and doing the same for Deck 2
Step 2
Once the songs have loaded onto their designated decks, press play on your digital controller for Deck 1. Raise the volume for Deck 1 by moving the volume fader up. Make sure Deck 2’s volume fader is down so you can sync the music in time with Deck 1, through your headphones.
Step 3
While Deck 1 is playing you will see on your laptop screen that both songs showing their BPM (beats per minute). If the BPM’s are different you will need to make them the same tempo. This is done by moving the tempo fader on your dj controller up or down. You will see the BPM go up or down on the screen whilst you move this fader.
Step 4
Once they are the same BPM you’re now able to start mixing the two songs together. Do this by tapping on the cue button of Deck 2 to the beat of what is playing out on Deck 1. You will want to hit the play button on deck 2 when deck 1 starts a new bar. A good way to know when a new bar is about to start is to count the beat of the song in fours. At the end of every fourth beat a new bar has started and would be an ideal time to press play on Deck 2.
Step 5
Once you have pressed play on Deck 2 start to move the volume fader on your dj controller up for Deck 2. Both tracks should be playing out through the speakers now.
Step 6
If you find that Deck 2 is lagging, you can speed it up by pushing the jog wheel on your dj controller forward and if it is rushing you can slow it down by pulling the jog wheel back so the two songs remain in time.
Step 7
Once you are ready to mix out of Deck 1 slowly take it’s volume fader down on the dj controller so Deck 2 is playing by itself.
BASIC EQ-ING
Eq-ing is a skill that needs to be learnt in order to achieve smooth transitions between two songs when beat matching. It can also be used to manipulate the frequencies within a song you’re playing to emphasise the feeling of that particular section within the track. This guide will give you all the tips and tricks on how to eq, so you can use this tool effectively.
How EQ works
Every mixer these days will have a set of eq’s (equalisers) on them ranging from high, mid and low. This usually consists of three knobs per channel, with each knob controlling a particular frequency range. The lowest knob will control the lowest frequency range, middle knob controlling your middle frequency range, and high knob controlling your high frequencies. If all knobs are pointed up they are completely levelled in volume and the song is playing all frequencies at the correct level. If you twist one of the knobs to the left it will start reducing the DB (decibel) of that frequency range and if you twist it to the right it will start adding DB to that frequency range. With this you can essentially manipulate the frequencies within the song to fit with your mixes.
Basic EQ-ing when Beat-Matching
Step 1
Select two tracks that you think will mix well together.
Step 2
While your first track is playing and you’re getting Track 2 in time in your headphones. Make sure the low-end frequency is turned all the way down. The reason this is done is so when you are mixing the two songs together your song will not clash for a seamless blend.
Step 3
When you are ready to mix your two songs together bring the volume up on Track 2 with the low frequency knob all the way down. As the mix of the two songs progress you can start fading the low frequency knob on Track 1 down and start turning it up on Track 2.
Step 4
Once the eq on Track 1 has been taken down completely and Track 1’s is full start to slide the volume fader down on track 1 to complete the mix.
EQ-ing to create dynamics within a song
When you find yourself in between mixes it can sometimes be appropriate to experiment with your eq’s on the song playing to create more of a dynamic atmosphere. This can be a simple matter of taking all the bass out the track during the build up and then adding it back as the song peaks to emphasise the drop. Or if you find the song playing has an extended period where it repeats (commonly found in dance music) you can take out either of the eq ranges (low, mid and high) during this period is happening for a bar or two and bring it back to create more interest within the track. You’ll find that the bass of the song, especially in dance music carries so much of the track’s energy that manipulating the low tones within the song can add a completely new feel to the track.
Basic use of Effects on your Pioneer DJM DJ Mixer
Every Pioneer DJM mixer (excluding DJM250MK2 and DJMS9) comes with a range of Sound/Colour Effects and Beat FX that can be used on your selected song. Depending on which DJM mixer you have, the number of effects will vary. Your entry level DJM450 2 Channel DJ Mixer will have eight Beat FX. These are Delay, Echo, Spiral, Reverb, Trans, Flanger, Pitch, and Roll.The DJM450 will also have four Sound/Colour Effects which are Dub Echo, Sweep, Noise and Filter. These effects open up a whole new dimension to djing and knowing how to apply them to your sets can take your dj-ing to a whole new level. This basic guide on how to use these effects will show you how each type of effect can elevate your sets.
How to use Sound / Colour Effects
Step 1
If you look along the left hand side of your DJM mixer you will see that there are four effects that can be selected; Dub Echo, Sweep, Noise and Filter. To apply one of the effects on your desired track you will first need to press the one you wish to use.
Step 2
Once it has been turned on it will start flashing. Twist the Colour Knob above the cue button to have it affect the song you want on that particular channel. Twist the knob clockwise or anti clockwise.
Step 3
If you twist it clockwise it will apply that effect while increasing the frequency the more the knob is turned.. When you twist the knob anti-clockwise it will apply the effect, reducing the frequency the more the knob is turned.. If you wish to reduce the feedback/wetness of the effect twist the knob until it’s pointing upwards.
How to use Beat Fx
Step 1
On the bottom right-hand side of your mixer is where your Beat Fx are located. To select your Beat Fx, twist the knob to one of eight displayed effects on your mixer.
Step 2
You then need to assign this effect to a channel, done by twisting the knob below the effects knob to your desired channel. Usually you will be able to pick from Crossfader A/B, Mic, Aux, Channel 1, Channel 2 (if you’re using a 4-channel mixer four channels will be available to select from) and Master.
Step 3
After selecting the effect you wish to use and the channel it will be applied to, you need to make sure the effect is in time to the song playing. You can see if it is in time by looking at the screen just above the effects knob. On that screen it should show a number. If that number is matching the BPM of the track then the effect will be in sync with the track when turned on.
Step 4
If the number is not the same as the BPM you can change it by either tapping the TAP button to the beat of the song till the bpm is synced. On some of the newer DJM mixers there’s an auto sync next to the tap button which can automatically put the effects in time to the song.
Step 5
Once the BPM of the song and the effects match, you can now turn on the effects button, which is the orange button located at the bottom right of the mixer. When pressed, it should start flashing; this means the effects are active.
Step 6
Just above this button there is a Level/Depth knob which you can twist to control the dryness and wetness of the track. The more you twist it up the more feedback you should receive from the track, while turning it back will apply less of the effect to the song.

DJ Glossary
Technical Terms
- Bass - Referring to the low frequencies in a song. (Kick, Bass any low sounds that may be playing in the song)
- Beat-Matching - DJ-ing Technique used to put two different songs in time and mix them together.
- BPM - Beats Per Minute
- CDJ - A piece of DJ equipment that allows you to play CD, USB, and SD cards. Some CDJs can be hooked up to your laptop through a DJ mixer.
- Cross-fader - A function on a DJ Mixer which allows you to cut between two tracks. This is commonly used for scratching.
- Cue - A function on your CDJ which allows you to save a moment within the song. Pressing the cue button allows you to return to that moment.
- Channel - A channel can be found on a DJ Mixer. Each channel controls a CDJ or turntable and usually come with a volume control and EQ.
- Deck - A term that refers to either a CDJ or Turntable.
- Daw - Digital Audio Workstation.
- Dry/Wet - Defines how much of an effect is heard when being processed through an audio sample. Dry means that no effect will be heard but wet means the sound is being affected.
- Loop - A dj technique which allows you to repeat a certain number of bars for however long you want.
- Mixer - A DJ mixer is an audio mixing console. It allows you to mix between turntables, CDJ’s or various laptop softwares like Rekordbox or Serato.
- Timecode Vinyl/CD’s - A software which runs from your computer/laptop but can be controlled with CDJ or Vinyl hardware.
- Turntable - A record player used to play vinyl.
- Waveform - A visual representation of a song or audio clip.
Equipment & Controls
- Equalizer (EQ) – EQ is a function used on a DJ mixer that allows you to control the frequency spectrum. This is usually done with 3 knobs, each representing a section of the full frequency range.
These are High, Mid and Low:
Low – Your low frequency range that usually controls your bass and kick
Mid: This is the middle frequency range that sits in between your low and highs.
High: Your highest frequency range that sits on top of the mids and lows.
- Fader – Allows you to adjust the volume on a particular channel to be louder or softer.
- Sampler – A sampler is a piece of equipment that allows you to take a moment from a song and play it over a track on the fly.
- FX – Controls that allow you to alter the sounds in your song in various ways.
They include:
Chorus – An effect that can be used mainly in music production which doubles the sound but adds latency, usually around 20 milliseconds, to create a wider texture.
Flanger: Works similar to Chorus, doubling the sound but adding a shorter latency. This interacts with original sound giving it a sharp gliding texture.
Phaser: Phaser, like Chorus and Flanger, doubles the sound but is polarising the doubleds signal which is how phase is created. It gives the original sound a swooshing effect.
Echo: An effect that will echo your track as it fades out. The duration of the echo can be manipulated on a DJ mixer.
Delay: A Delay will repeat a sent signal over and over depending on how much feedback you use.
Reverb: Emulates what you’re playing and puts it in a particular space. This can make what you are playing quite airy or distant.
Spiral: The spiral effect adds Reverb and Delay to your sound but will also change the pitch of the sound depending on if you make the length of the Reverb/Delay longer or shorter.